
Explanation of the Attendance Lockout Feature
Lock selected sites out of taking meal counts after the fact — either after a set number of days, or across a specific range of dates. A sponsor-level control for keeping point-of-service attendance honest.
Sponsors should consider using this function in either of these situations:
- You require that all — or specific — sites take electronic (live) meal counts at point of service, and you want to lock them out after a day or a set number of days.
- A site-level review turned up record-keeping non-compliances, and you need to prevent that site from claiming certain meals or days.
Option 1 — Meal lockout based on # of days after
-
Choose the number of days — it applies globally
There is only one day-count setting for the whole sponsorship, but you still pick which facilities it affects, so only the sites you choose are locked out.
-
Set the day count in Sponsor Settings
Go to Home → Sponsor Information → Sponsor Settings.
- Set Use Meal Lockouts if you like. This does not have to be TRUE for the lockout to work, but there’s no harm in turning it on.
- Set Allowable Days After Date For Attendance to any value from 0–8 days. Days lock out at midnight.
- Click SAVE SPONSOR INFO.
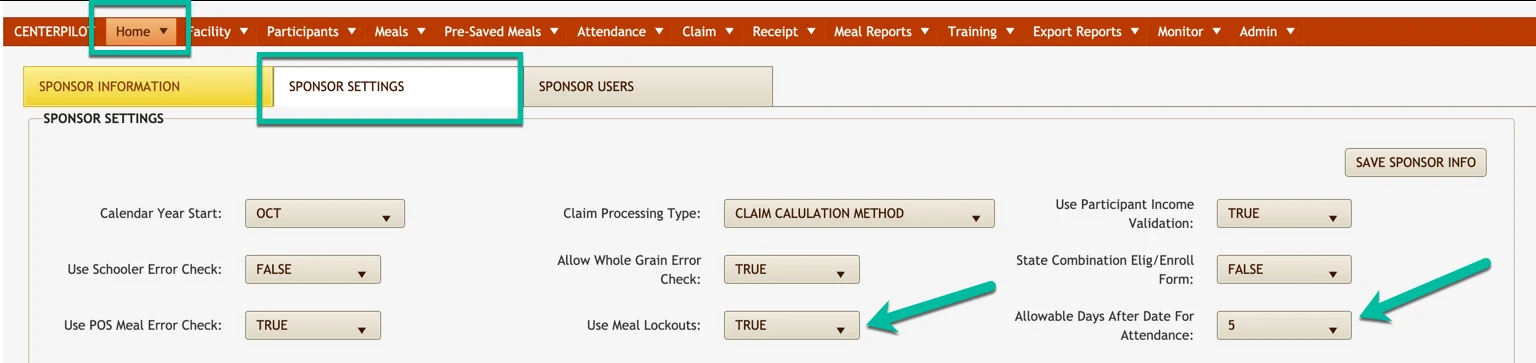
Sponsor Settings — set Use Meal Lockouts and Allowable Days After Date For Attendance, then save. -
Open the facility’s Office Use Only tab
Go to Facility → Facility Information, select the facility to be locked out, and open the Office Use Only tab.

Pick the facility, then open the Office Use Only tab. -
Scroll down to the Meal Attendance Lockout feature
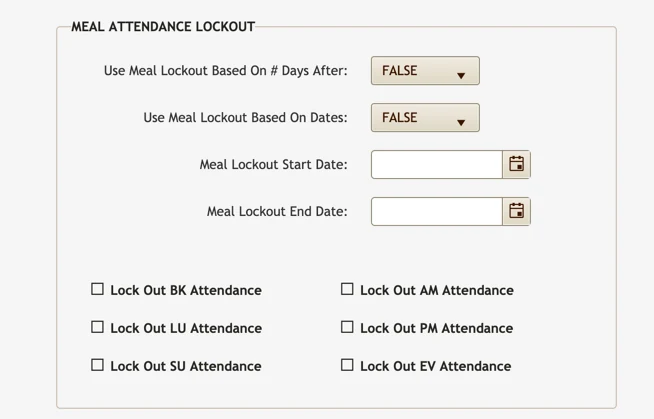
The Meal Attendance Lockout panel before any changes. -
Turn on the day-based lockout and pick the meals
- Change the first option, Use Meal Lockout Based On # Days After, to TRUE.
- Check which meals to lock out. Checking only specific meals blocks only those meals for all blocked days; checking all meals blocks all meals for all blocked days.
- Click SAVE FACILITY SETTING in the upper-left of the screen.
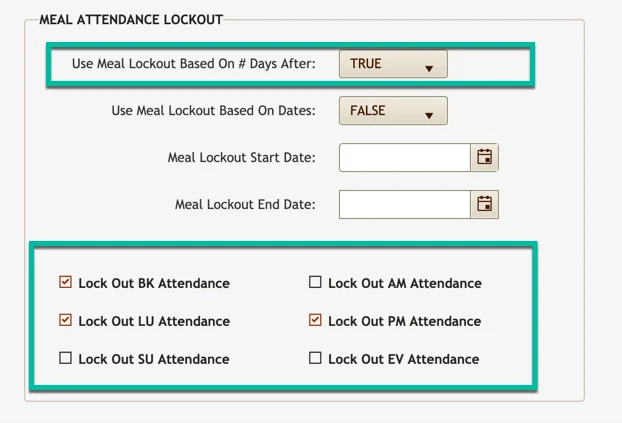
Option 1 configured — day-based lockout on, with specific meals selected.
Option 2 — Meal lockout based on dates
No Sponsor Settings setup required. This option is configured entirely at the facility level.
-
Open the facility’s Office Use Only tab
Go to Facility → Facility Information, select the facility to be locked out, and open the Office Use Only tab — the same path as Option 1.
-
Scroll down to the Meal Attendance Lockout feature
-
Turn on the date-based lockout, set the range, and pick the meals
- Change the second option, Use Meal Lockout Based On Dates, to TRUE.
- Enter a first and last date to lock out every day between them — including those two dates.
- Check which meals to lock out. Checking only specific meals blocks only those meals for all blocked days; checking all meals blocks all meals for all blocked days.
- Click SAVE FACILITY SETTING in the upper-left of the screen.
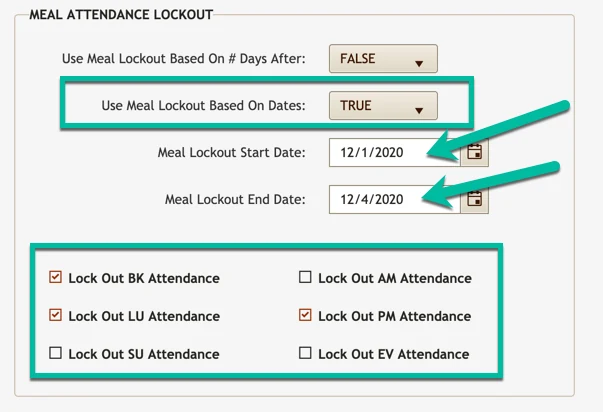
Option 2 configured — date-based lockout on, with a start/end date and specific meals selected.
← Back to Training & Handbooks · Questions? Call (214) 427-4467 — a real person answers.
Want a guided tour instead?
Schedule a free 30-minute demo and we’ll walk you through lockouts — and anything else — live, using your own program.